Chargie for Android
The ultimate battery protection app. Extend your battery lifespan by up to 4x.
Supported Platforms
Android Phones
Android 5.0 (Lollipop) or later
Background service with notification
Foreground service for stable connection
Tablets & ChromeOS
Android tablets supported
ChromeOS compatibility
Optimized for larger screens
Explore the Chargie App

Optimal Charging at 80%
What's New in Version 2026.1
Power Stats
Real-time charging graphs with watts, amps, and temperature.
Hardware Limiter
Basic & Smart modes work even when app is closed.
Smart Scheduler
Per-day scheduling with full tank option.
Battery Health
Track degradation with mAh capacity estimates.
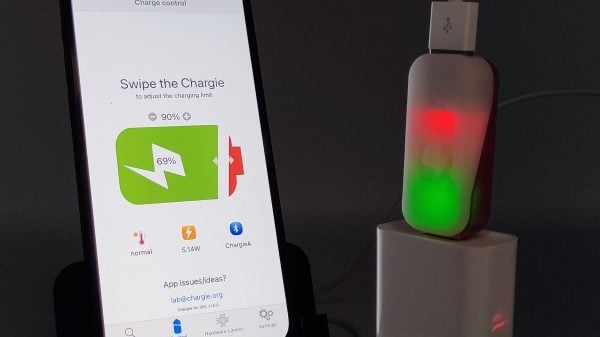
🎛️ Main Control Screen
The central hub for managing your Chargie device with an intuitive interface showing all charging information at a glance.
- Swipe slider to set charge limit (0-100%)
- Real-time charging status with time remaining
- Temperature, power stats, and scheduler icons
- Quick access to all features via icon grid
Charge Limit
Swipe to adjust limit from 0-100%
Charging Status
Shows current %, time remaining, and charge drop setting
Feature Icons
Quick access to scheduler, limiter, battery health & more
Enable Toggle
Turn scheduler on/off with one tap
Per-Day Schedule
Set time and target % for each weekday
Full Tank
Charge to 100% on demand
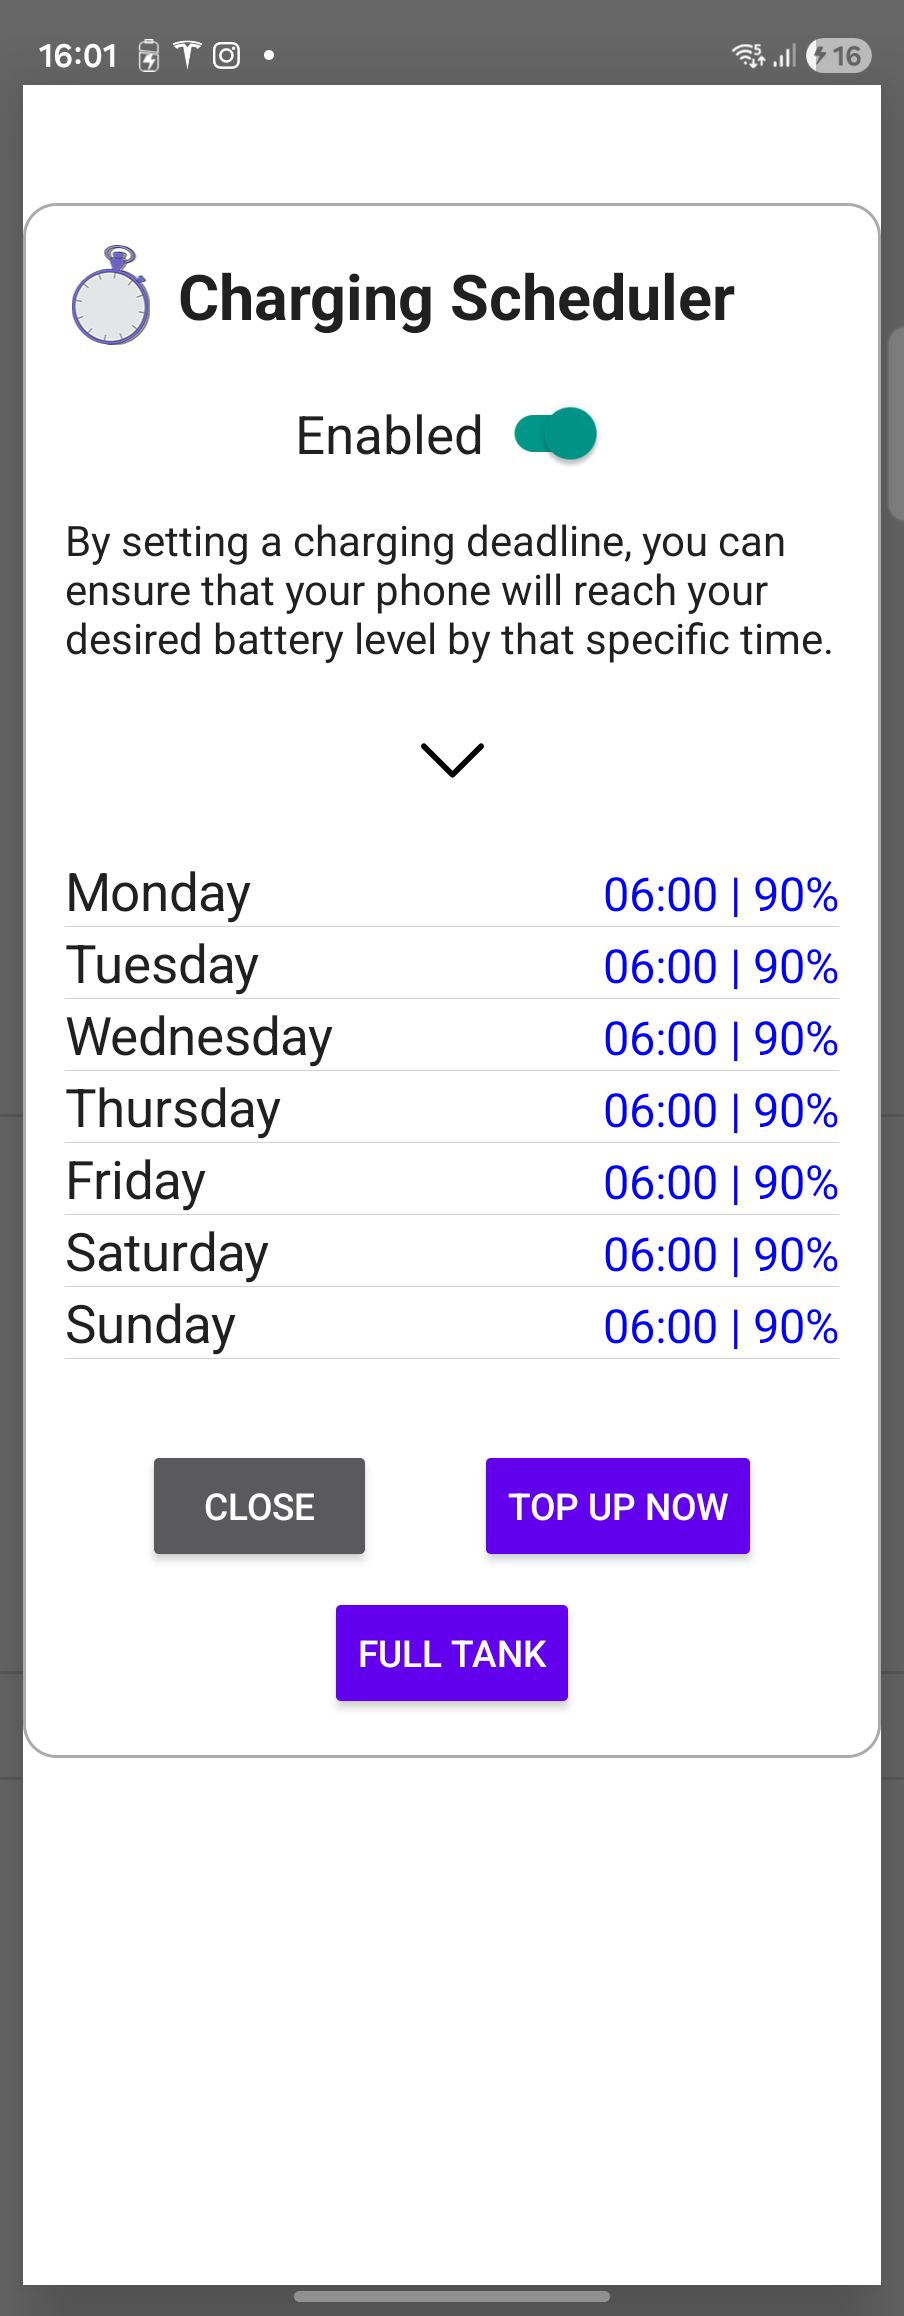
⏰ Smart Charging Scheduler
Set automated charging schedules for each day of the week. Your phone reaches your desired level exactly when you need it.
- Individual schedules per weekday
- Set wake-up time and target battery %
- "Top Up Now" for immediate charging
- "Full Tank" to charge to 100% on demand
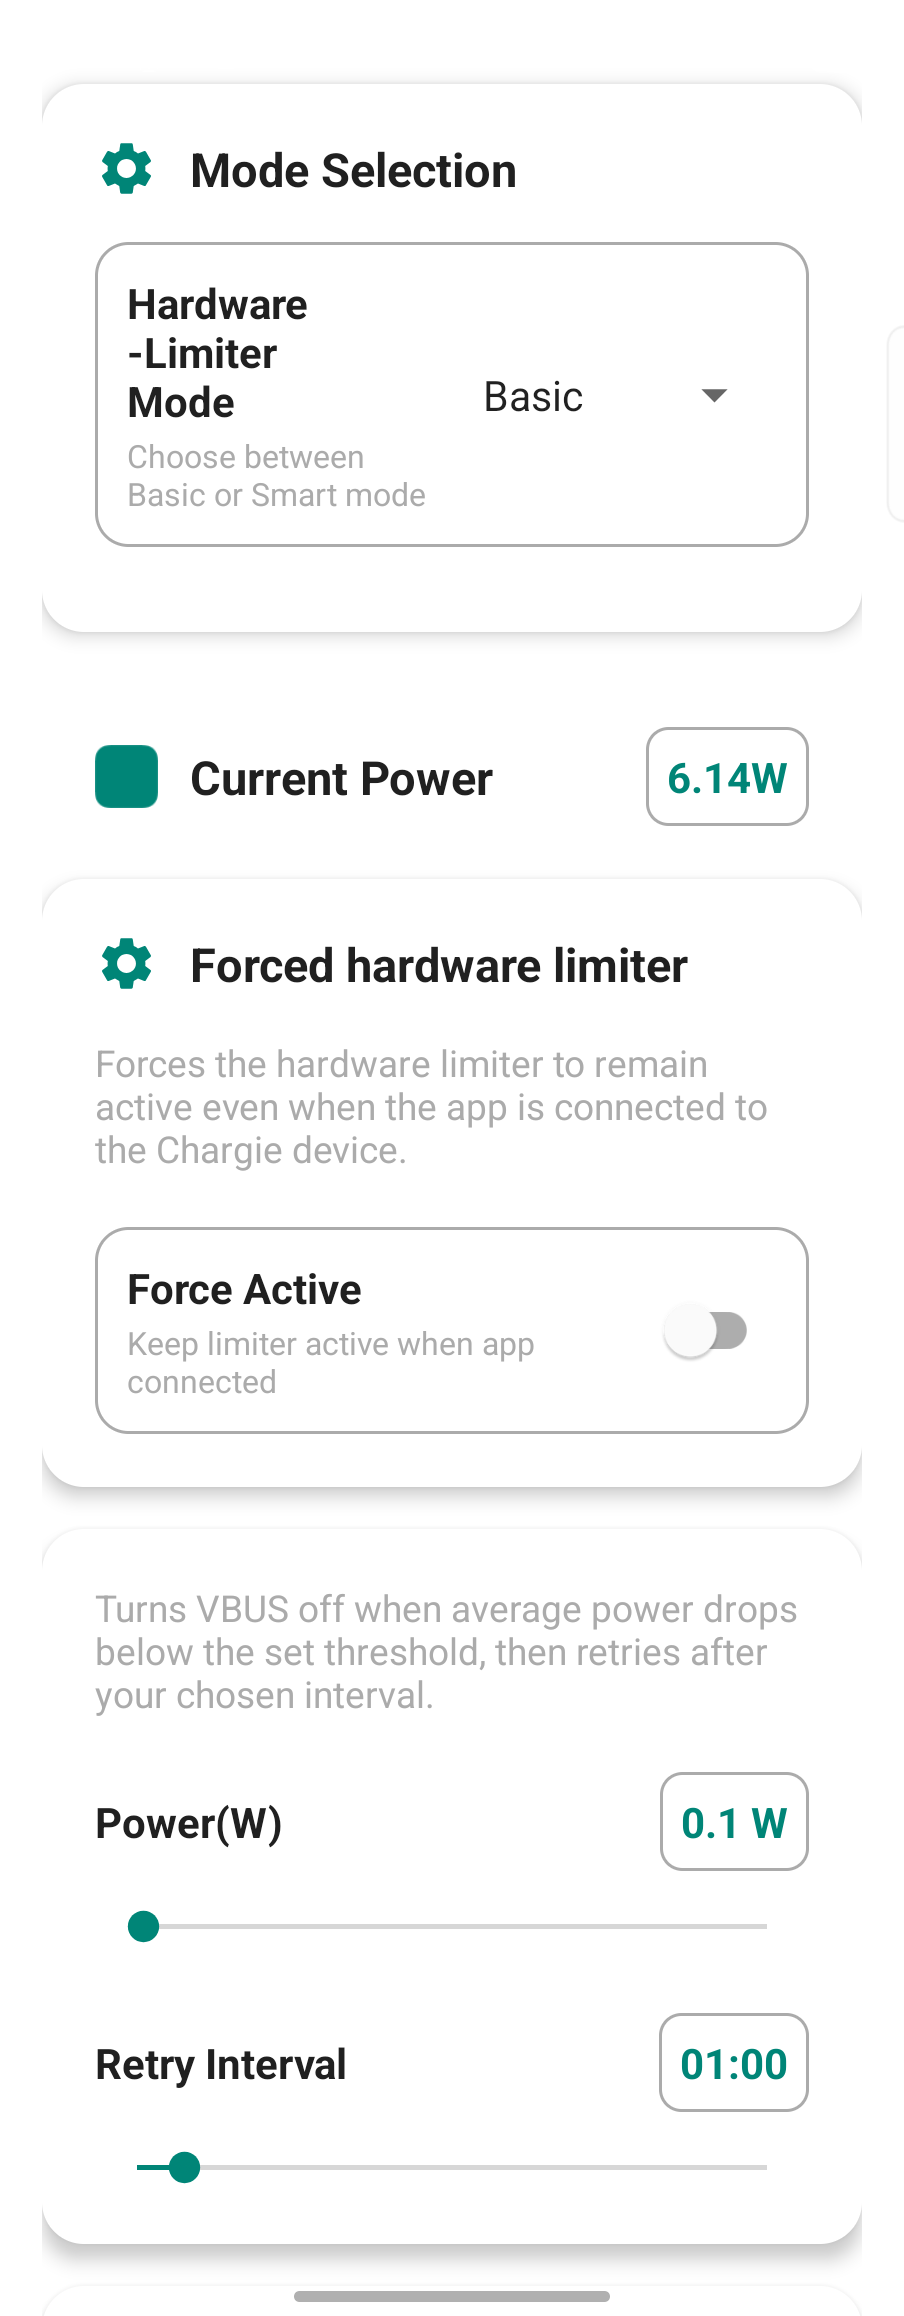
⚡ Hardware Limiter
Protection that works even when the app is closed or your phone is powered off. The Chargie device handles everything.
- Basic Mode: Fixed power threshold cutoff
- Smart Mode: Detects charging completion by power drop %
- Configurable retry interval for gentle charging
- Force Active option keeps limiter on with app connected
Mode Selection
Choose Basic, Smart, or Off
Force Active
Keep limiter active even with app connected
Power & Retry
Set power threshold and retry interval
Power Graph
Visual chart of charging metrics over time
Real-time Metrics
Amps, temperature, voltage, mAh, duration
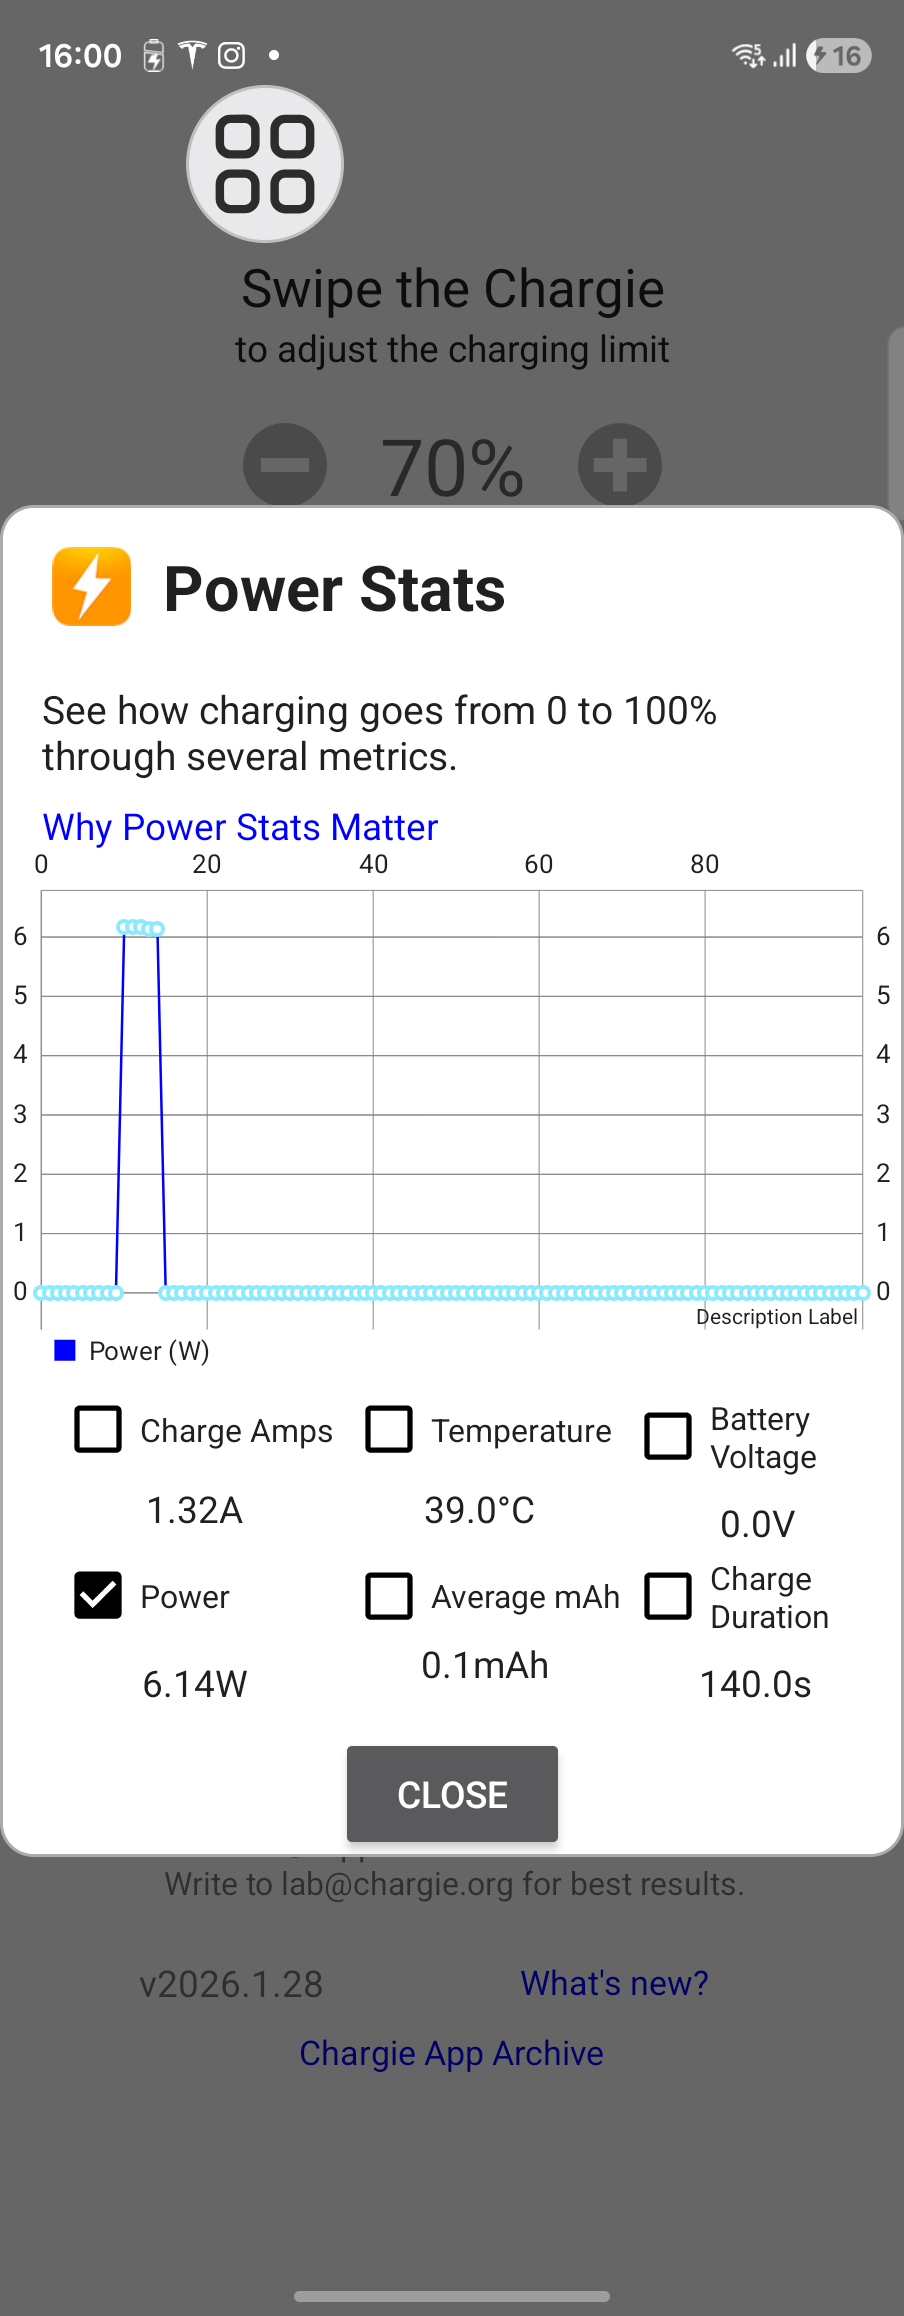
� Power Statistics
See exactly how charging progresses from 0 to 100% with detailed metrics and visual graphs.
- Real-time power graph (watts over battery %)
- Charge amps, temperature, battery voltage
- Average mAh and charge duration tracking
- Toggle individual metrics on/off
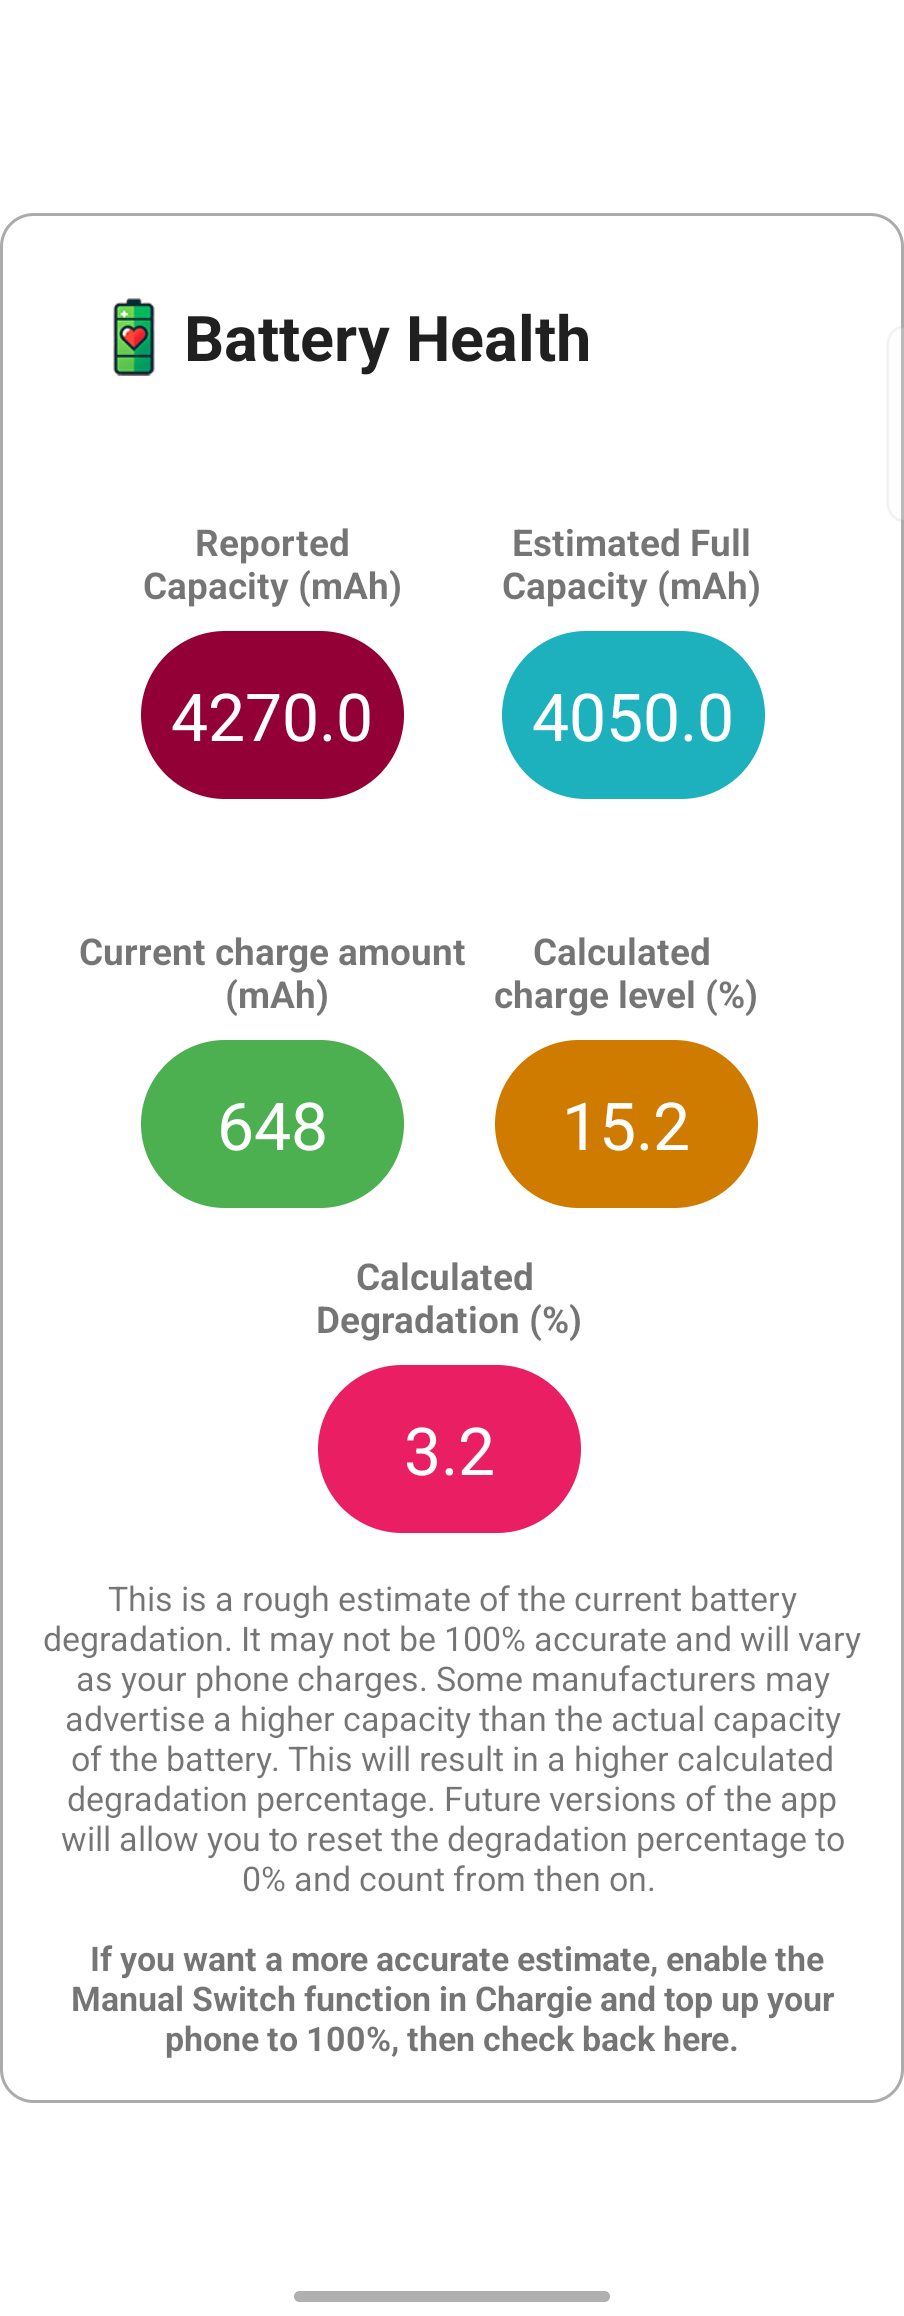
🔋 Battery Health Monitor
Track your battery's degradation over time with estimated capacity metrics based on Android's battery data.
- Reported capacity vs estimated full capacity (mAh)
- Current charge amount in mAh
- Calculated degradation percentage
- Enable Manual Switch for more accurate readings
Reported Capacity
What Android reports (4270 mAh)
Estimated Full
Calculated actual capacity (4050 mAh)
Degradation
Calculated wear: 3.2% in this example
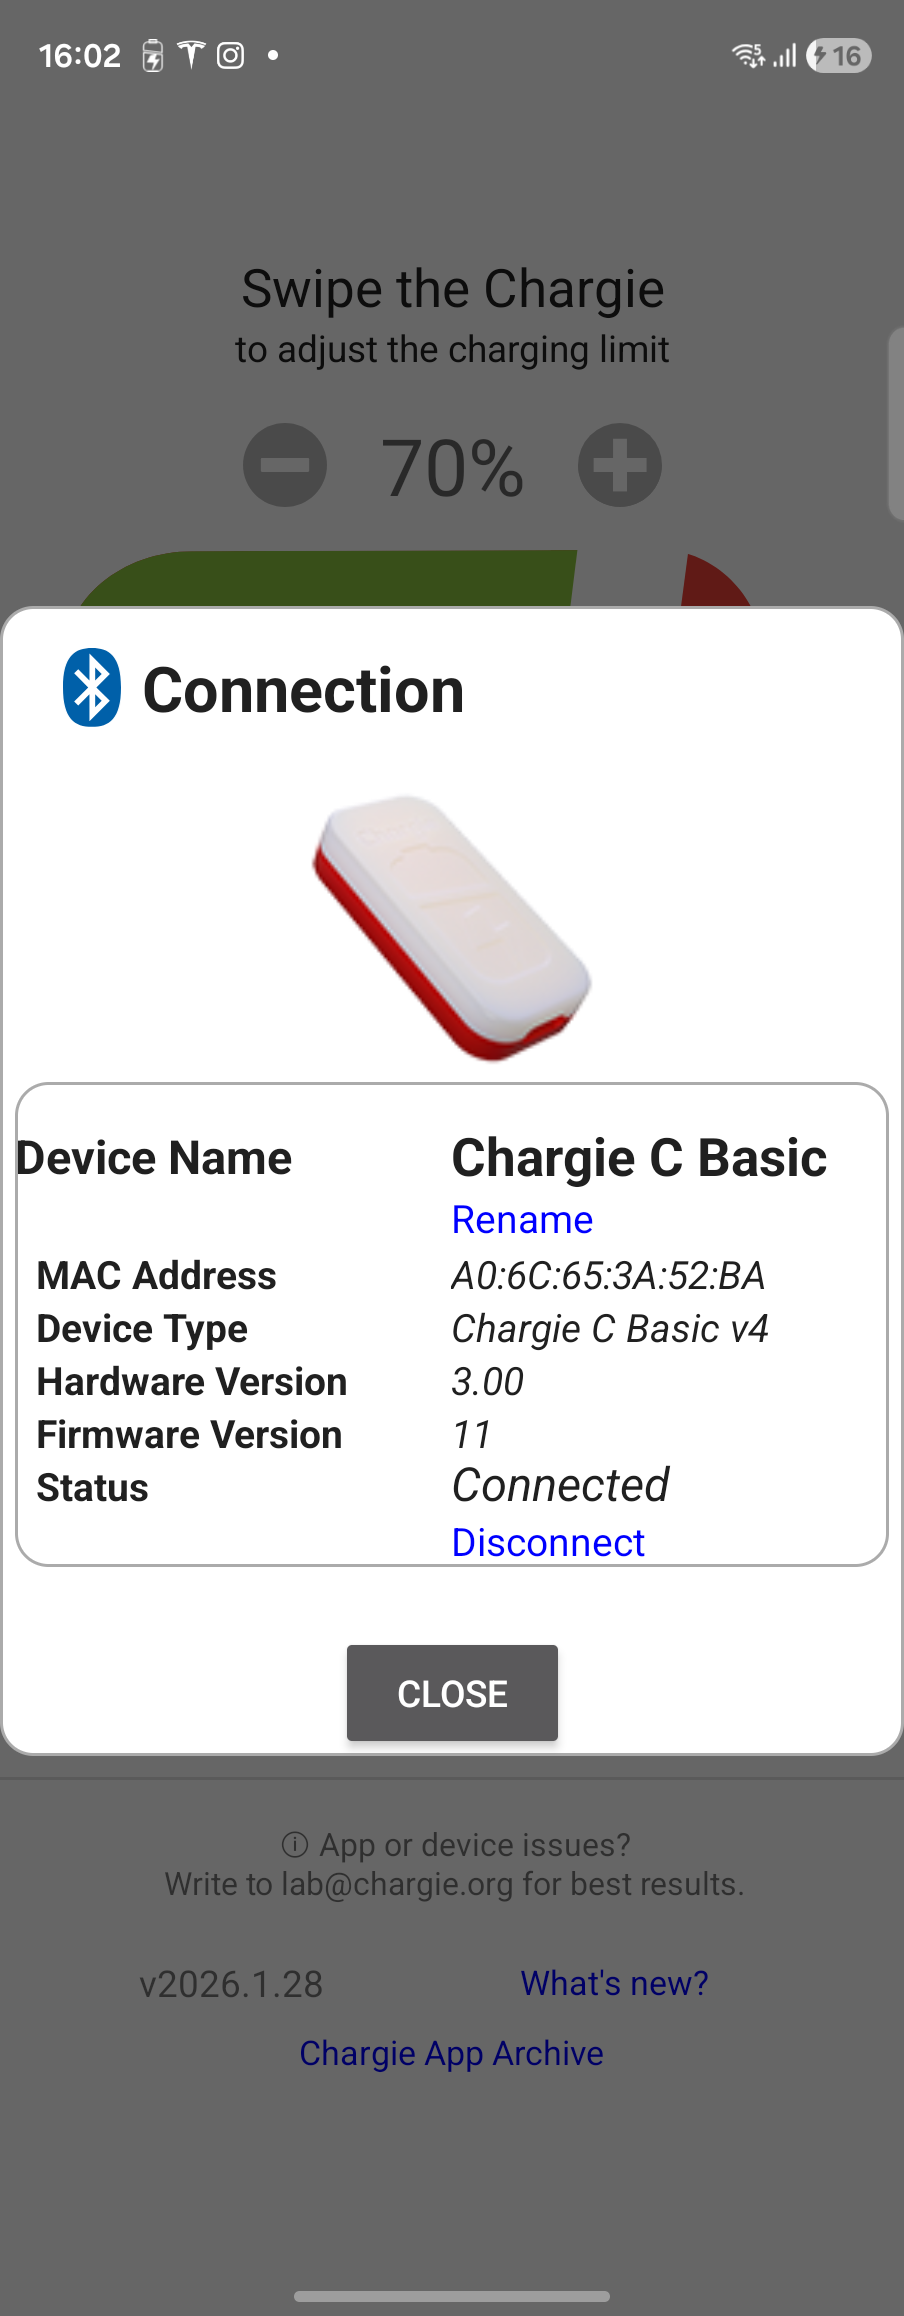
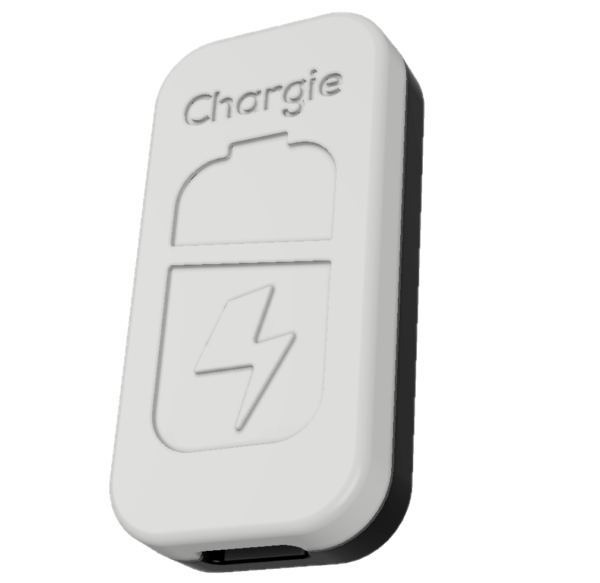
Device Image
Visual identifier of your Chargie model
Device Info
Name, MAC, type, versions, status
🔗 Device Connection
View comprehensive device information and manage your Chargie connection with detailed hardware data.
- Device name with rename option
- MAC address for identification
- Hardware version and firmware version
- Real-time connection status with disconnect option
🌡️ Temperature Protection
Automatically pause charging when your device gets too warm. Heat is the enemy of battery health.
- Set custom temperature threshold (26-60°C)
- Charging pauses when threshold exceeded
- Resumes automatically when cooled down
- Recommended range: 30-40°C for safety
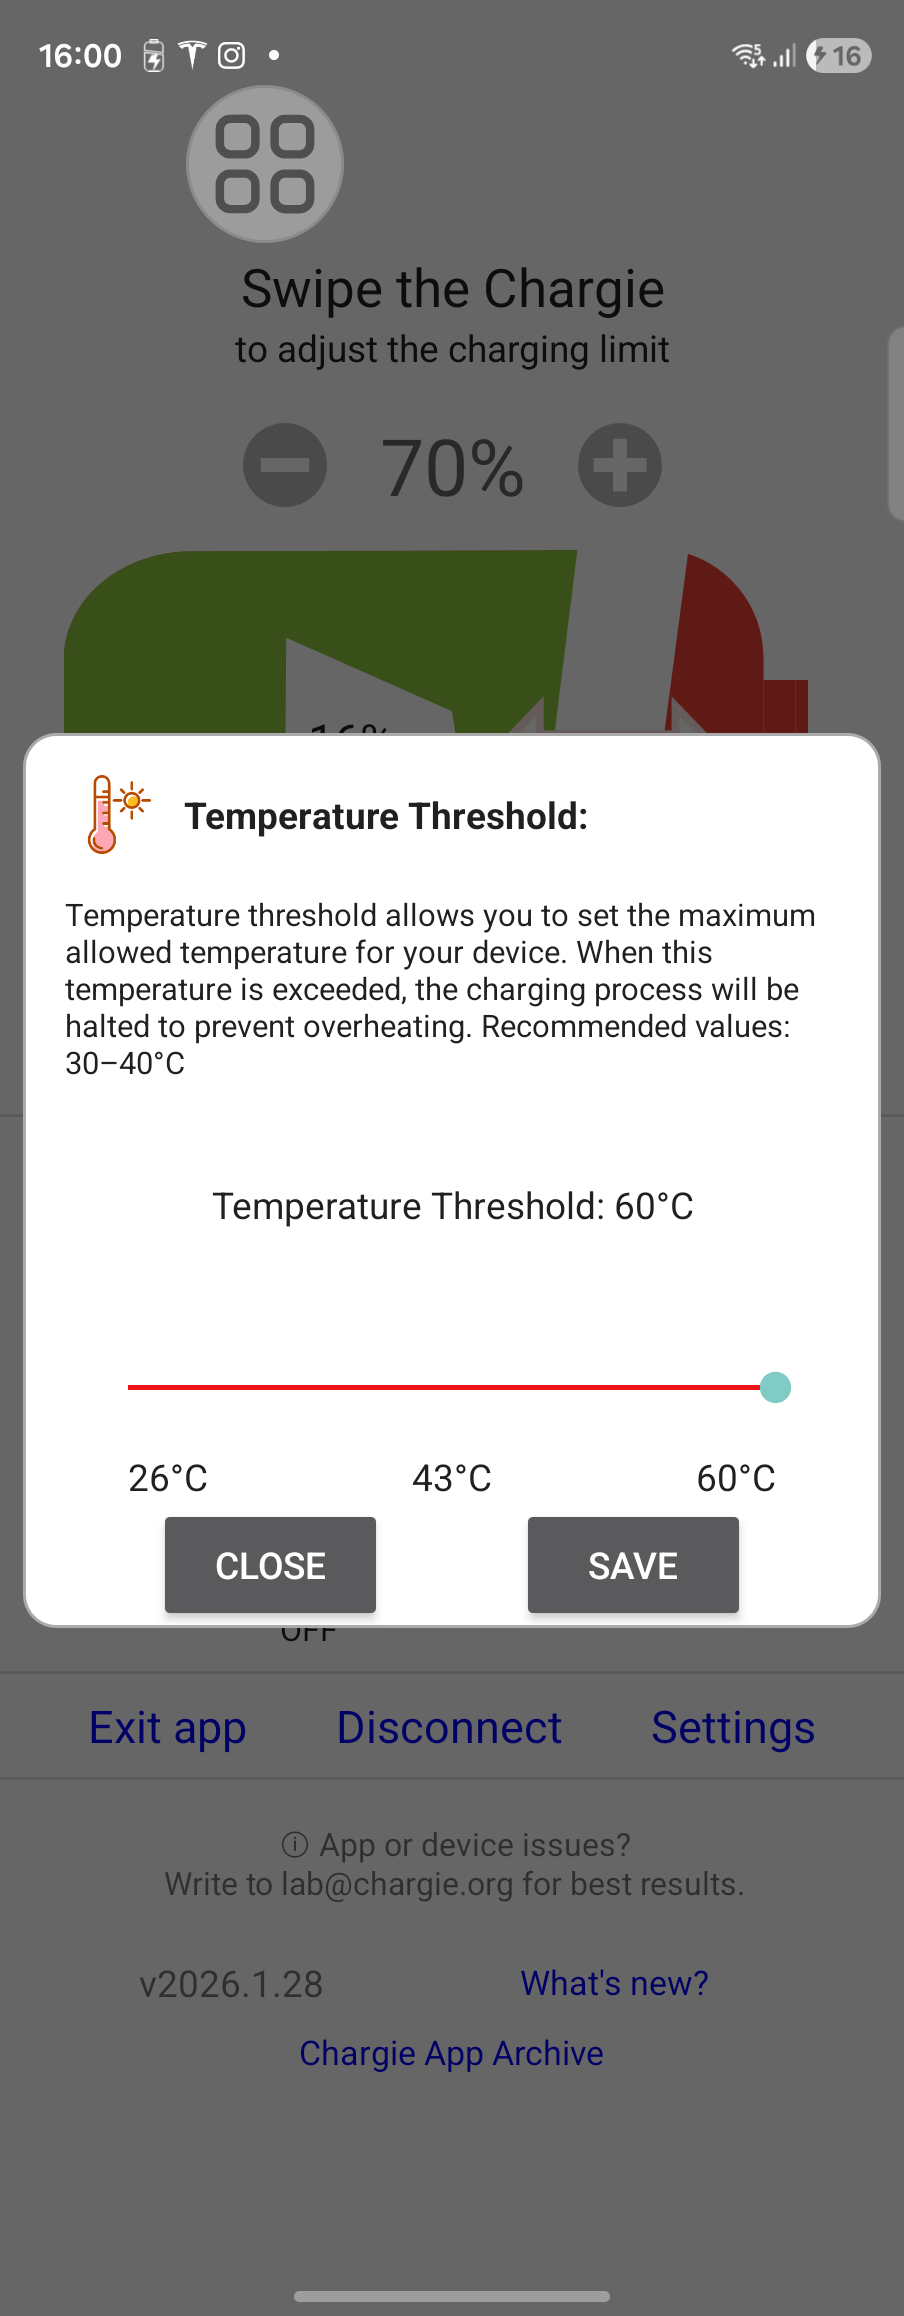
Temperature Slider
Drag to set your preferred threshold
Save Button
Confirm your temperature setting

Slider Control
Set drop % with slider or +/- buttons
Save Setting
Confirm to apply charge drop value
📉 Allowed Charge Drop
Set how much your battery can drop before Chargie resumes charging. This creates a gentle hysteresis cycle instead of constant on/off.
- Prevents constant charge cycling near the limit
- Recommended values: 3-5%
- Range: 0% to 57%
- Example: 90% limit + 3% drop = cycles between 87-90%
💡 Manual Switch Mode
Use your Chargie as a Bluetooth-controlled switch for any USB device. Perfect for LED strips, fans, or other USB gadgets.
- Control any USB device via Bluetooth
- Persistent mode keeps switch active after closing popup
- Temporarily disables charge limiting
- Works even when phone screen is off
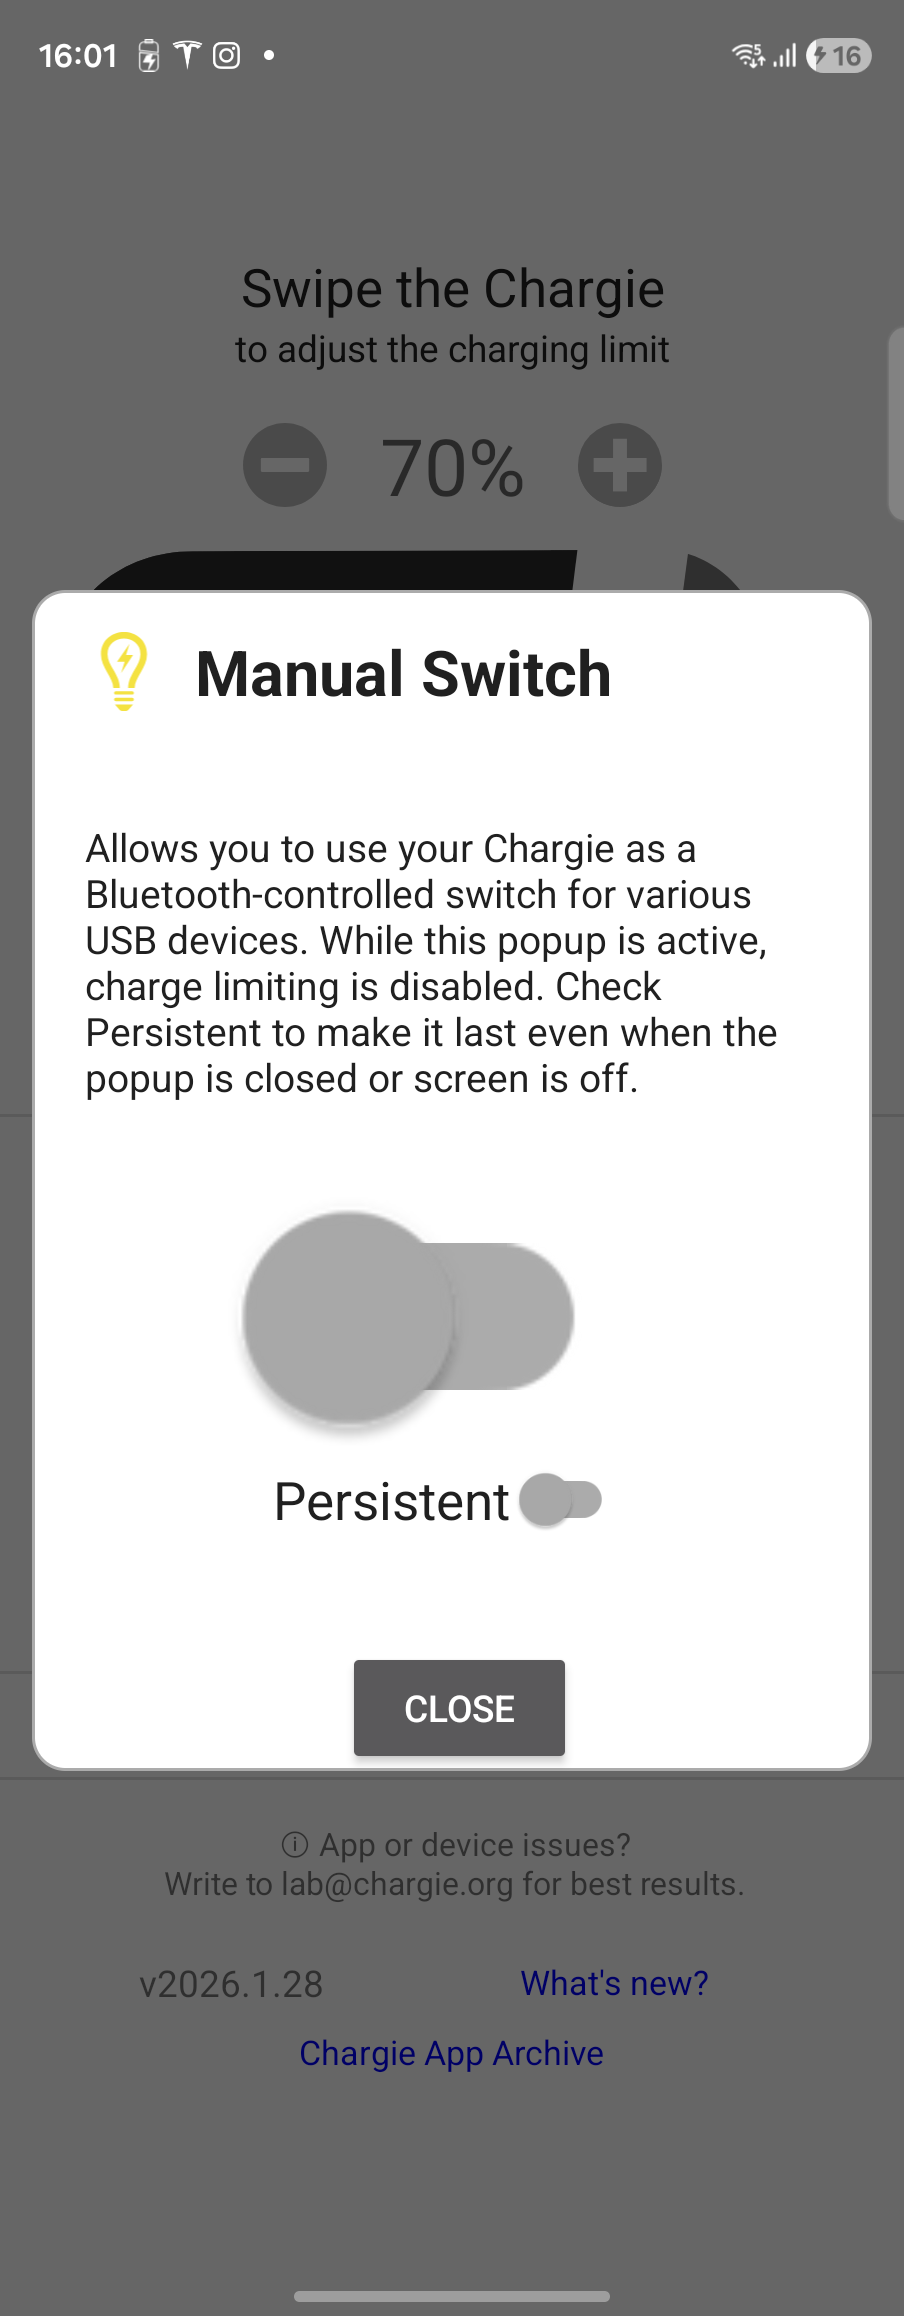
Switch Toggle
Turn USB power on/off manually
Persistent Mode
Keep switch active when popup closes
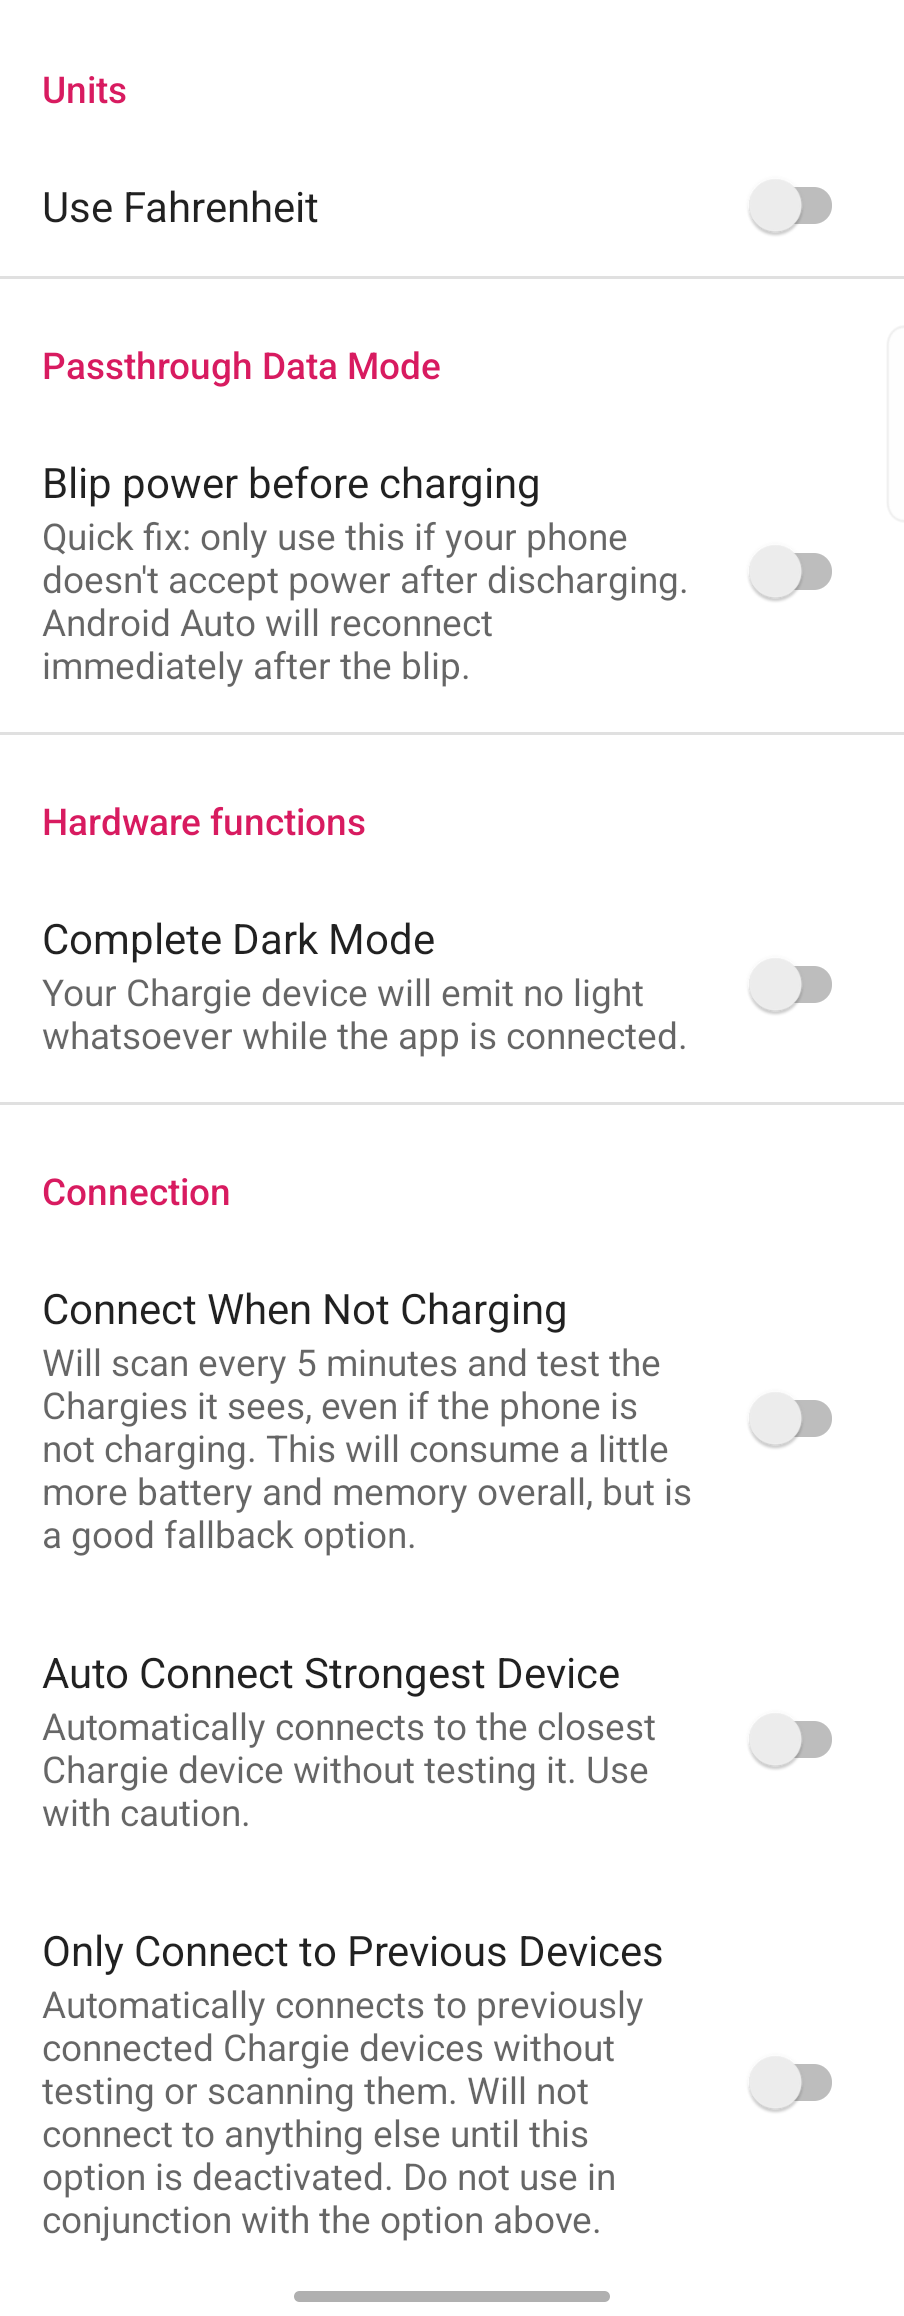
Units
Switch between Celsius and Fahrenheit
Dark Mode
Turn off all Chargie LEDs for stealth
Connection Options
Customize reconnection behavior
⚙️ Advanced Settings
Fine-tune every aspect of how Chargie works with your device through comprehensive settings.
- Units: Celsius or Fahrenheit temperature display
- Dark Mode: Turn off all Chargie LEDs
- Passthrough: Android Auto data mode with power blip option
- Connection: Auto-connect options and device scanning preferences
App Features
Quick Setup
Hardware Connection
Install App
Requires Android 5.0+
Grant Permissions
Allow Bluetooth and Location permissions when prompted. Location is required by Android for BLE scanning.
Set Charge Limit
Swipe the Chargie slider to your desired limit. 80% recommended for maximum battery longevity.
Hardware Setup
Chargie A (USB-A)
Insert between wall adapter and your charging cable
Chargie C (USB-C)
INPUT → Power Adapter | OUTPUT → Device
Privacy & Security
- No data collection - Your data stays on device
- Local Bluetooth only - No cloud, no internet required
- No tracking - Zero analytics or telemetry
- No account needed - Just install and use
Troubleshooting
1. Ensure Bluetooth and Location are enabled
2. Check Chargie is plugged into power
3. Grant all required permissions
4. Try unplugging and re-plugging Chargie
5. Force close and reopen the app
1. Disable battery optimization for Chargie
2. Lock the app in recent apps (swipe down on app card)
3. Check manufacturer-specific battery settings
4. Enable "Connect When Not Charging" in Settings
5. Samsung: Disable "Put unused apps to sleep"
1. Ensure app is running (check notification)
2. Check Bluetooth connection is active
3. Enable Hardware Limiter for app-independent protection
4. Verify Chargie firmware is current
1. Enable "Passthrough Data Mode" in main screen
2. Try enabling "Blip power before charging" in Settings
3. Make sure Chargie firmware supports data passthrough
4. Some older Chargie models may not support this feature
1. Hardware Limiter activates when Bluetooth disconnects
2. Check that Hardware Limiter is enabled (not set to "Off")
3. Choose between Basic and Smart modes
4. Smart mode requires a PD (Power Delivery) charger
5. Ensure Chargie firmware supports this feature
1. Enable Manual Switch and charge to 100% for accurate reading
2. Some manufacturers report higher capacity than actual
3. Data improves over time as app learns your device
4. This is an estimate based on available Android APIs
Need Help?
Last Updated: February 1, 2026