How to Fix Battery Corrosion A Practical Guide
To deal with battery corrosion, you'll need to clean up the gunk—that white, crusty stuff is a clear sign your device needs help. If it’s from a regular battery (like a AA), a mild acid like vinegar or lemon juice does the trick. For a leak from an acid-based battery (like in a car), something like baking soda is your best bet. The real key, though, is to clean the contacts safely and make sure it doesn't happen again.
What Is That Crusty Stuff on Your Batteries?
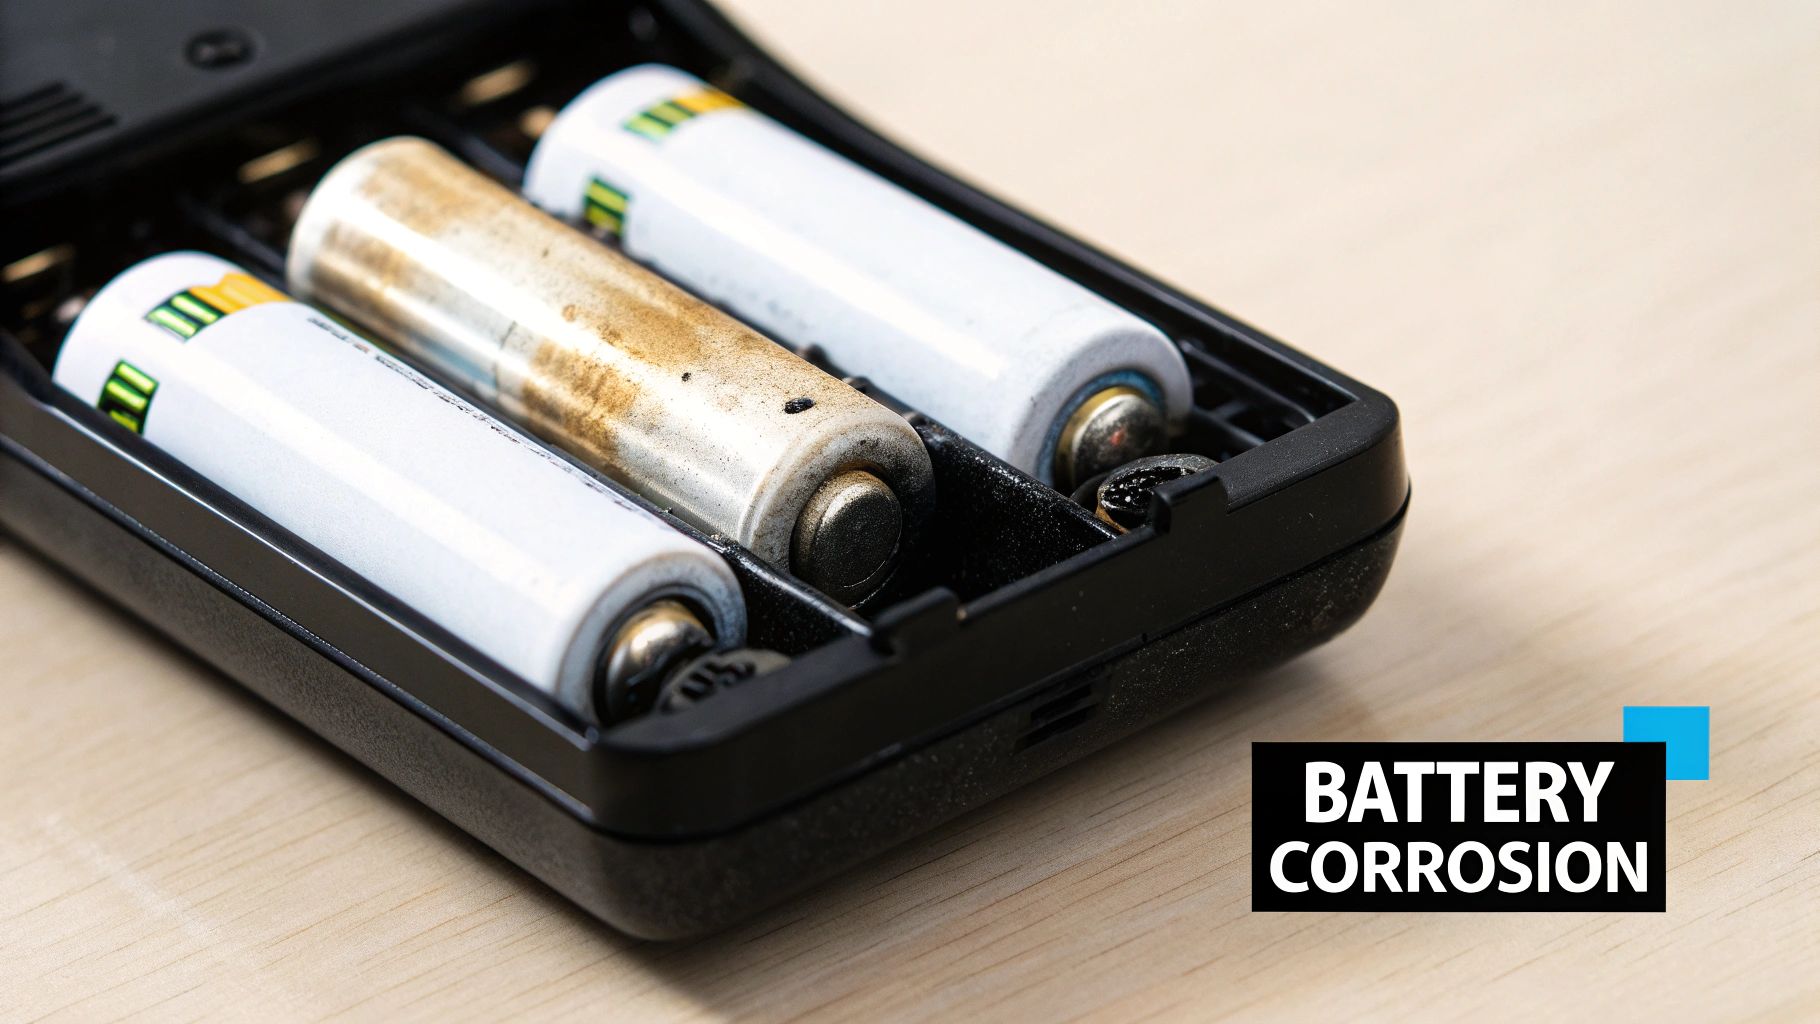
We’ve all been there. You open a forgotten TV remote or an old flashlight and find a white, fuzzy, or sometimes bluish-green crust coating the batteries and the metal parts they touch. That stuff is battery corrosion, and it’s a common reason your electronics suddenly stop working. It's just a chemical reaction that happens when a battery starts leaking.
This leakage happens for a few reasons. Sometimes, a battery is just old, and its seals have broken down. Other times, it’s because you left a device somewhere damp or in a hot car.
The Science Behind the Crust
Without getting too deep into the science, that crusty material is what happens when the chemicals inside the battery escape and react with the air and the metal contacts in your device. The kind you'll see most often comes from standard batteries, like the AAs or AAAs in your remote.
This gunk is usually a substance that has leaked out and reacted with everything it touches. In fact, it's estimated that 10-20% of battery failures in our everyday gadgets are due to this kind of leakage damage. You can find more about the chemical process and its environmental impact on sites like https://chargie.org/tag/battery/.
The main thing to remember is that this corrosion isn't just an ugly mess—it blocks the flow of electricity. That’s why your device suddenly plays dead, even with what you thought were fresh batteries.
Identifying the Type of Leakage
While most of the corrosion you’ll find in household gadgets comes from regular batteries, it helps to know what you’re dealing with. A quick look can tell you a lot.
This quick guide should help you figure out what's going on inside your device at a glance.
Identifying Different Types of Battery Corrosion
| Appearance | Common Battery Type | What It Is |
|---|---|---|
| White and Fluffy | Regular batteries (AA, AAA, C, D) | This is a type of salt that forms when the leaked chemical reacts with the air. |
| Green or Blue | Various (often in older electronics) | This usually happens when the leaked chemical reacts with the copper contacts inside your device. |
Knowing what you’re up against is the first step. It helps you choose the right cleaning method and gives you a clue about the health of the battery and device.
Gathering Your Tools for a Safe Cleanup
Before you even think about scraping away that crusty mess, let's get ready. Taking a minute to get your supplies together is the most important part of this whole process. When you're dealing with battery corrosion, you have to put safety first. That leaked chemical gunk can be nasty stuff, causing real irritation to your skin and eyes, so this isn't the time to cut corners.
The great news is you likely have everything you need lying around the house. Think of it less like a major repair and more like a simple kitchen-table science experiment.
Your Safety and Cleaning Checklist
First up, personal protection. You wouldn't handle oven cleaner without gloves, right? The same idea applies here. The leaked stuff from a regular battery can be harsh.
- Protective Gloves: Any old pair of rubber dishwashing gloves or even disposable ones will work perfectly. You just need a solid barrier between that corrosion and your skin.
- Safety Glasses or Goggles: This one is a must. The last thing you want is for a flake of dried chemical or a splash of cleaning solution to end up in your eye.
With your hands and eyes covered, it's time to grab your cleaning stuff. It all comes down to simple chemistry: you'll use a mild acid to clean up a leak from a regular battery, or a mild base (like baking soda) for an acid leak.
For that classic, crusty white buildup you see from common batteries (like your AAs and AAAs), a simple paste made from baking soda and a few drops of water is your best friend. If you’re facing a leak from a car battery or an old rechargeable cell, which is acidic, a cotton swab dipped in distilled white vinegar or lemon juice will do the trick.
Finally, you need some tools to do the actual cleaning. An old toothbrush is perfect for scrubbing into the little corners of a battery compartment, and a few cotton swabs are great for the delicate metal parts. Keep a couple of paper towels handy for wiping everything down when you're done.
Putting in a little effort now can make a huge difference in how long your electronics last. For more great advice on this, check out these excellent resources on battery maintenance. A little prep makes the whole job quicker, safer, and a lot more effective.
Alright, with your safety gear on and your tools ready, it's time to get hands-on. This is where we get rid of that nasty gunk and bring your device's battery contacts back to life. The goal isn't just to scrub off the visible stuff, but to completely clean up the chemical residue so your new batteries can make a solid connection.
First things first: carefully open up the battery compartment and get those corroded batteries out of there. Just set them on a paper towel for now—we'll deal with throwing them out properly later. Remember, leaky batteries are hazardous waste, so don't just toss them in the kitchen trash.
Brush Away the Loose Stuff First
With the old batteries gone, you'll probably see a lot of flaky, crusty buildup left behind. Before you grab any liquids, it's a good idea to clear out as much of that dry mess as you can.
Grab an old, dry toothbrush or a small, stiff-bristled brush. Gently scrub the battery compartment and the metal contacts to knock all those loose bits free. I recommend doing this over a trash can to keep the mess contained. Try not to breathe in the dust. Getting the loose stuff out now makes the next part of the cleanup way easier.
The infographic below shows the simple tools you'll be using for the deep-cleaning phase.
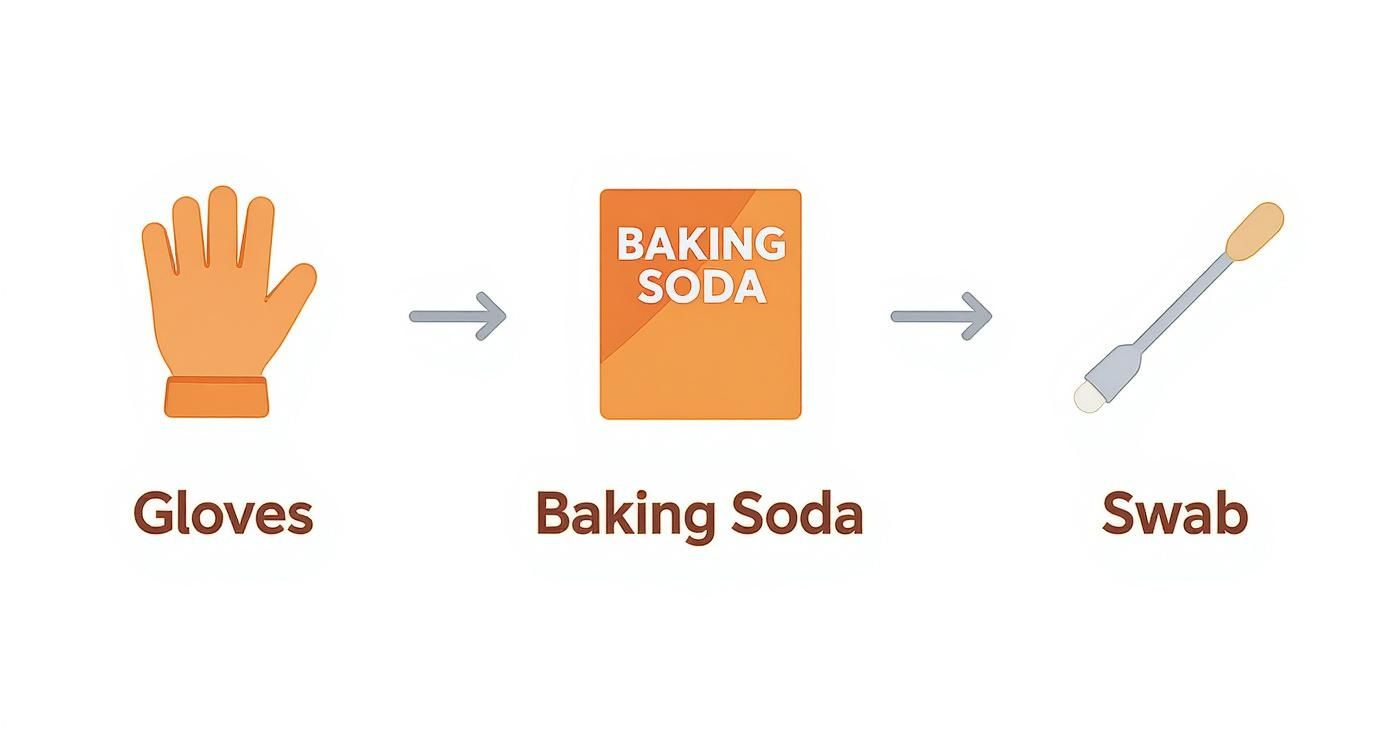
As you can see, you don't need any fancy equipment. These are all common household items that do the job perfectly.
Time to Clean the Corrosion
Now for a little kitchen chemistry. For that common white, crusty stuff from regular batteries, baking soda is your best friend. Mix a tiny bit of baking soda with just a few drops of water until you have a thick paste—think toothpaste consistency.
Dip a cotton swab in your paste and apply it directly to the corroded metal contacts. You should see a gentle fizzing. Don't worry, that's a good sign! It means the baking soda is working against the battery leak.
Let the paste sit and do its thing until the fizzing stops. That little reaction tells you the corrosive stuff has been cleaned up.
Once the show is over, take a clean cloth or paper towel, dampen it slightly with water, and wipe away all the leftover paste. Be thorough here; any baking soda left behind can also block the connection.
Finally, use a dry cloth or the corner of a paper towel to make sure the entire battery compartment and contacts are 100% dry. This is a critical step. Moisture is what causes corrosion in the first place, so don't rush it. Only pop in the new batteries once everything is completely clean and bone-dry.
How to Prevent Battery Corrosion from Returning
So you’ve cleaned up the mess. The last thing you want is for that crusty, white gunk to come back. The good news is that keeping it from returning is way easier than cleaning it up in the first place. A few simple habits are all it takes.
One of the easiest wins is also the most overlooked: just take the batteries out. If you've got a device you won't be using for a while—think holiday decorations packed away for 11 months or that emergency flashlight in the back of a drawer—pop the batteries out. Leaving them in devices that aren't being used is basically asking for a leak.
Smart Battery Habits for Long-Term Health
It turns out that the type of batteries you use, and how you use them, makes a huge difference. Not all batteries are created equal, and a little planning can save you a lot of future headaches.
- Stick to High-Quality Brands: It's tempting to grab the cheapest off-brand batteries, but they often have a much higher chance of failing. Leaks are just more common as they age, so spending a bit more on a good brand is a smart move.
- Don't Mix and Match: Never combine old batteries with new ones. Same goes for mixing different brands in the same device. This creates an imbalance where one battery works harder, drains faster, and gets stressed out—which is when it's most likely to fail and leak.
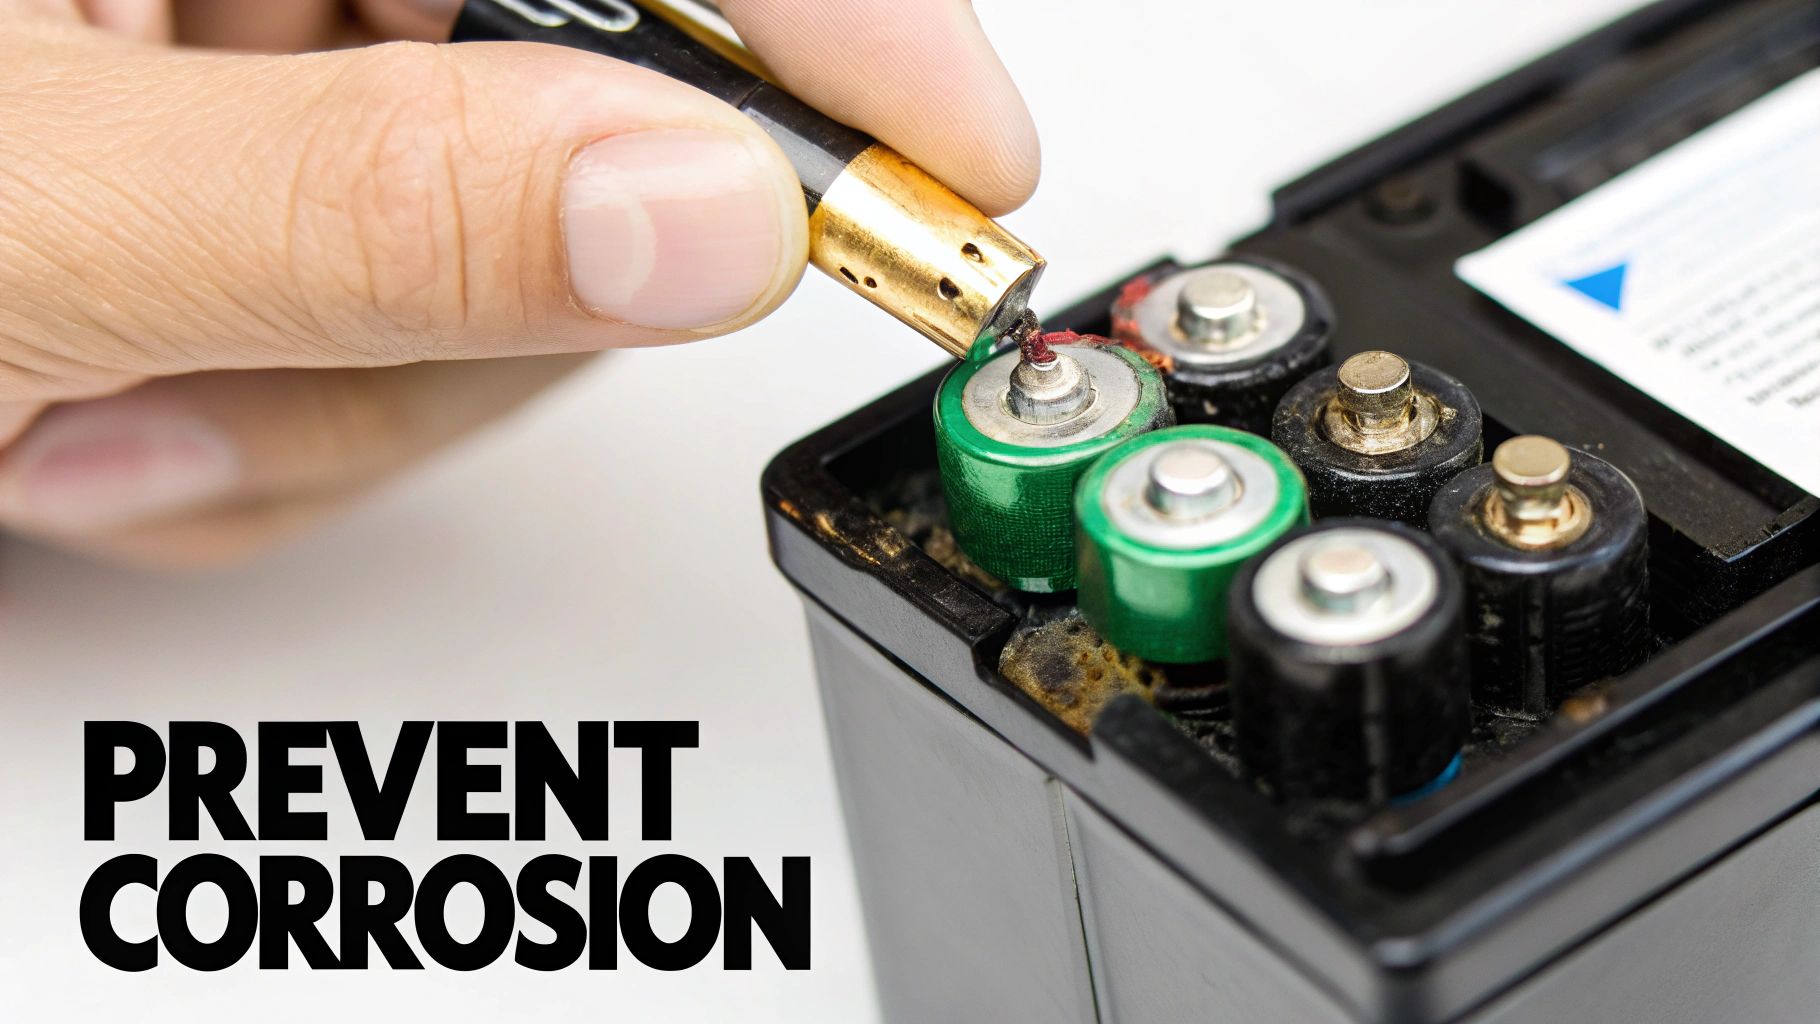
Here’s a pro tip I swear by: once the terminals are clean, apply a super-thin layer of dielectric grease. In a pinch, even plain petroleum jelly works. It creates a barrier that seals out air and moisture, the two main things corrosion needs to get started.
Creating a Protective Barrier
This is a simple but surprisingly powerful step. Once you’re positive the contacts are clean and bone-dry, just put a tiny dab of grease on the end of a cotton swab and gently coat the metal parts. You don't need to smear it on; a little goes a long way.
This small step is actually part of a massive industrial strategy. The global market for coatings that protect against corrosion is huge—that's how seriously pros take prevention. It shows how powerful creating a simple barrier can be.
The idea of shielding sensitive parts is used everywhere. If you want to see how this works in some of the harshest conditions, check out these guides on fighting salt corrosion on boats. Your TV remote might not be battling saltwater, but the basic idea of sealing out the elements is exactly the same.
Knowing how to clean up battery corrosion is a great skill to have, but it’s just as important to recognize when a device can't be saved. Trust me, sometimes a home fix just won't cut it, and trying to force it will only lead to frustration. Learning to spot when it's a lost cause will save you a massive headache.
The biggest red flag? When that crusty mess has spread beyond the battery area. If you see that white or greenish gunk creeping onto the main circuit board, the fight is probably over. Those delicate electronic parts are extremely sensitive to corrosive chemicals, and once they're damaged, it's usually permanent.
Telltale Signs of Damage That Can't Be Fixed
You also need to give the physical parts a hard look. Are the metal battery springs or contacts looking thin, brittle, or completely eaten through by rust? If the metal itself is visibly worn out, no amount of cleaning is going to bring back a solid connection.
Another dead giveaway is damage to the plastic casing. Leaked battery acid can make plastic very brittle, causing it to crack or even crumble. If the housing that holds the batteries is broken, the device is simply not safe to use anymore.
Ultimately, the clearest sign is when the device still won't power on after you've done everything right. If you've cleaned the contacts, made sure everything is bone dry, and you still get nothing… the internal parts are likely fried.
At this point, your best bet is a professional repair or a full replacement. If you decide to get rid of the item, remember that electronics and leaky batteries are considered hazardous waste. For those in the UK, guides covering UK hazardous waste disposal regulations are a great resource for proper handling. Disposing of it responsibly is a huge part of learning how to reduce electronic waste.
Still Have Questions About Battery Corrosion?
Once you’ve successfully cleaned up that fuzzy blue-and-white mess, a few questions usually come to mind. That’s perfectly normal. Let's tackle some of the most common ones I hear.
People often ask about using lemon juice instead of vinegar. Can you do it? Absolutely. Lemon juice is just another mild acid, and it does a fantastic job of cleaning the gunk from your typical AA or AAA batteries. If that's what you've got in the kitchen, go for it.
What About Car Batteries and Getting Rid of Old Ones?
Another big one: how do you safely throw out a leaky, corroded battery? It’s simple, but critical—leaky batteries are considered hazardous waste. Whatever you do, don't just toss them in the kitchen trash.
Here’s the right way to handle them:
- First, seal the corroded batteries inside a plastic bag to stop any more gunk from getting out.
- Then, get in touch with your local waste management service. A quick search for "battery recycling near me" or "hazardous waste drop-off" will point you in the right direction.
It’s a huge mistake to think cleaning a car battery is anything like cleaning one from a TV remote. Yes, the science is similar, but a car battery is a completely different beast.
Car batteries are filled with very strong acid and can even release flammable gas. Tackling that job safely requires proper safety gear, a stiff wire brush, and a real car battery cleaning solution—not just baking soda and water. You really can't take shortcuts here; the risk is just too high. Respect the difference and use the right tools for the job.
At Chargie, our goal is to help your batteries live longer, which means less waste and more money in your pocket. Our smart device stops the overcharging that puts stress on batteries and causes them to fail early. You can keep your electronics healthy from day one with a smarter way to charge from https://chargie.org.